Home > Arts > Artists > B > Samuel Begg
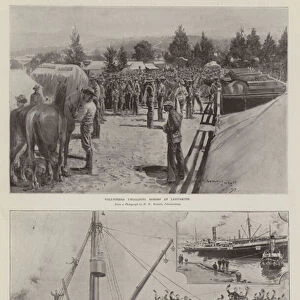
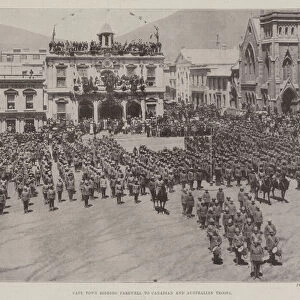
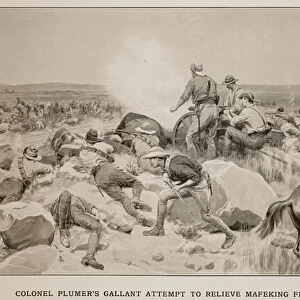
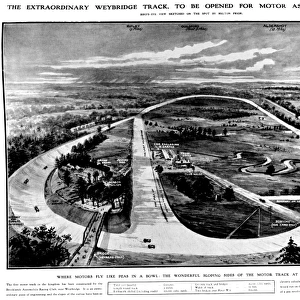
The surrender of Kroonstadt: Troops marching past Lord Roberts and staff

![]()
Wall Art and Photo Gifts from Fine Art Finder
The surrender of Kroonstadt: Troops marching past Lord Roberts and staff
STC363430 The surrender of Kroonstadt: Troops marching past Lord Roberts and staff, from a sketch by Melton Prior (1845-1910) (litho) by Begg, Samuel (fl.1886-1916); Private Collection; (add.info.: Field Marshal Frederick Sleigh Roberts, 1st Earl Roberts (1832-1914) distinguished Anglo-Irish soldier and one of the most successful commanders of the Victorian era; The Second Boer War (1899-1902); ); The Stapleton Collection; British, out of copyright
Media ID 22679032
© The Stapleton Collection / Bridgeman Images
2nd Boer War British Army Cheering Civilians Parade Parading Pith Helmets Rifles Waving
FEATURES IN THESE COLLECTIONS
> Africa
> South Africa
> Related Images
> Animals
> Farm
> Related Images
> Animals
> Mammals
> Horse
> Related Images
> Arts
> Artists
> B
> Samuel Begg
> Arts
> Artists
> I
> Samuel Ireland
> Arts
> Artists
> P
> Melton Prior
> Fine Art Finder
> Artists
> Samuel Begg
> Fine Art Finder
> Artists
> William (after) Small
> Fine Art Finder
> War & Military Scenes: 20th Century
The Surrender of Kroonstadt - A Historic Moment Captured in Print
EDITORS COMMENTS
. This photo print, titled "The surrender of Kroonstadt: Troops marching past Lord Roberts and staff" immortalizes a significant event during the Second Boer War. The image showcases Field Marshal Frederick Sleigh Roberts, 1st Earl Roberts, an esteemed Anglo-Irish soldier and one of the most accomplished commanders of the Victorian era. In this scene, we witness British troops parading triumphantly through the streets as they celebrate their victory over the Boers. Clad in military uniforms with pith helmets atop their heads, these soldiers proudly carry rifles while riding majestic horses. Their presence exudes strength and determination. Lord Roberts stands prominently at the forefront, surrounded by his loyal staff members. As he watches his troops march past him with pride and discipline, it is evident that their success is attributed to his strategic leadership. The atmosphere captured in this lithographic print is electric; civilians cheer from afar as they wave flags in support of their victorious army. The sight of armed forces parading through a conquered town symbolizes not only military prowess but also signifies hope for peace and stability. This historical moment frozen in time serves as a testament to the bravery and resilience displayed by both sides during this tumultuous period. It reminds us of the sacrifices made by soldiers on all fronts and highlights Lord Roberts' exceptional command abilities that led to this decisive victory.
MADE IN THE USA
Safe Shipping with 30 Day Money Back Guarantee
FREE PERSONALISATION*
We are proud to offer a range of customisation features including Personalised Captions, Color Filters and Picture Zoom Tools
SECURE PAYMENTS
We happily accept a wide range of payment options so you can pay for the things you need in the way that is most convenient for you
* Options may vary by product and licensing agreement. Zoomed Pictures can be adjusted in the Cart.